NIO三大组件
Channel
channel 有一点类似于 stream,它就是读写数据的双向通道,可以从 channel 将数据读入 buffer,也可以将 buffer 的数据写入 channel,而之前的 stream 要么是输入,要么是输出,channel 比 stream 更为底层
常用的Channel有:
- FileChannel
- DatagramChannel
- SocketChannel
- ServerSocketChannel
Buffer
Buffer用来缓冲读写的数据,常用的有:
- ByteBuffer
- MappedByteBuffer
- DirectByteBuffer
- HeapByteBuffer
- ShortBuffer
- IntBuffer
- LongBuffer
- FloatBuffer
- DoubleBuffer
- CharBuffer
在NIO中数据总是从Buffer和Channel中之间流动。
Selector
selector 单从字面意思不好理解,需要结合服务器的设计演化来理解它的用途
多线程版本网络编程
1
2
3
4
5
6
|
graph TD
subgraph 多线程版
t1(thread) --> s1(socket1)
t2(thread) --> s2(socket2)
t3(thread) --> s3(socket3)
end
|
每来一个socket就启动一个线程
⚠️ 多线程版缺点
- 内存占用高
- 线程上下文切换成本高
- 只适合连接数少的场景
线程池版设计
1
2
3
4
5
6
7
|
graph TD
subgraph 线程池版
t4(thread) --> s4(socket1)
t5(thread) --> s5(socket2)
t4(thread) -.-> s6(socket3)
t5(thread) -.-> s7(socket4)
end
|
⚠️ 线程池版缺点
- 阻塞模式下,线程仅能处理一个 socket 连接
- 仅适合短连接场景
selector的设计
以上多线程和线程池的用法是以前使用BIO时,出现的方案。而NIO的核心就是selector。
selector 的作用就是配合一个线程来管理多个 channel,获取这些 channel 上发生的事件,这些 channel 工作在非阻塞模式下,不会让线程吊死在一个 channel 上。适合连接数特别多,但流量低的场景(low traffic)
1
2
3
4
5
6
7
|
graph TD
subgraph selector 的设计
thread --> selector
selector --> c1(channel)
selector --> c2(channel)
selector --> c3(channel)
end
|
创建selector 后调用 selector 的 select() 会阻塞直到 channel 发生了读写就绪事件,这些事件发生,select 方法就会返回这些事件交给 thread 来处理。
从ByteBuffer入门
 1
 2
 3
 4
 5
 6
 7
 8
 9
10
11
12
13
14
15
16
17
18
19
20
21
22
23
24
25
26
27
28
29
30
31
32
|
    <dependencies>
        <dependency>
            <groupId>io.netty</groupId>
            <artifactId>netty-all</artifactId>
            <version>4.1.39.Final</version>
        </dependency>
        <dependency>
            <groupId>org.projectlombok</groupId>
            <artifactId>lombok</artifactId>
            <version>1.16.18</version>
        </dependency>
        <dependency>
            <groupId>com.google.code.gson</groupId>
            <artifactId>gson</artifactId>
            <version>2.8.5</version>
        </dependency>
        <dependency>
            <groupId>com.google.guava</groupId>
            <artifactId>guava</artifactId>
            <version>19.0</version>
        </dependency>
        <dependency>
            <groupId>ch.qos.logback</groupId>
            <artifactId>logback-classic</artifactId>
            <version>1.2.3</version>
        </dependency>
        <dependency>
            <groupId>com.google.protobuf</groupId>
            <artifactId>protobuf-java</artifactId>
            <version>3.11.3</version>
        </dependency>
    </dependencies>
|
TestByteBuffer
 1
 2
 3
 4
 5
 6
 7
 8
 9
10
11
12
13
14
15
16
17
18
19
20
21
22
23
24
25
26
27
28
29
|
public class TestByteBuffer {
    public static void main(String[] args) {
        try (FileChannel channel = new FileInputStream("file.txt").getChannel()) {
            // 获取buffer
            ByteBuffer byteBuffer = ByteBuffer.allocate(10);
            while (true) {
                // 从Channel中读数据
                int len = channel.read(byteBuffer);
                if (len == -1) {
                    break;
                }
                // 反转缓冲区,切换到读
                byteBuffer.flip();
//                while (byteBuffer.hasRemaining()) {
//                    // 一次读一个字节
//                    byte b = byteBuffer.get();
//                    System.out.println((char) b);
//                }

                byte[] array = byteBuffer.array();
                System.out.println(new String(array));
                // 清空缓冲区,切换到写;
                byteBuffer.clear();
            }
        } catch (IOException e) {
            e.printStackTrace();
        }
    }
}
|
1、获取Channel
2、创建缓冲区
3、向缓冲器区写数据
4、调用flip()切换读模式
5、读取缓冲器数据
6、调用clear()或者compact(),切换到写模式
7、重复3~6步骤
ByteBuffer的内部结构
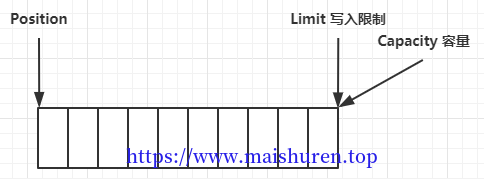
ByteBuffer 有以下重要属性
- capacity:整个buffer的容量
- position:当前写的位置
- limit:写入限制,初始状态下,limit=position
初始化状态:
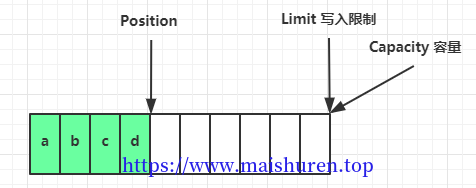
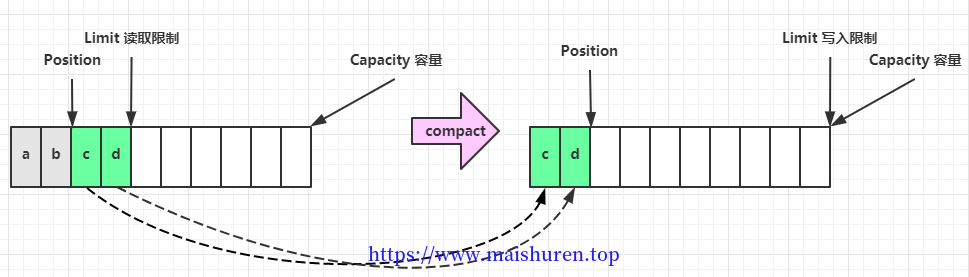
写入数据,position 是写入位置,limit 等于容量,为写入限制,下图表示写入了 4 个字节后的状态:
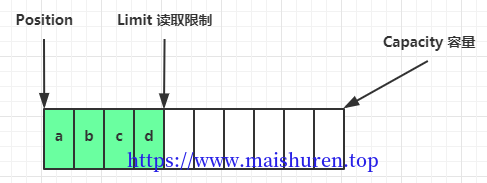
调用flip(),position的位置被重置到buffer最开始的位置,limit切换为读取限制
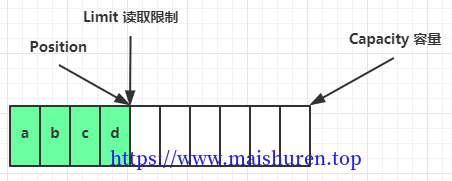
读取完写入的数据之后,position=limit,无数据可再读
调用clear()之后,可以说buffeer换到了初始化的状态。
至于compact()方法,是把还没有读完的部分向前压缩,然后切换到写模式
Buffer写入数据
有两种:
BUffer读取数据
同样有两种:
注意:get 方法会让 position 读指针向后走,如果想重复读取数据,可以调用 rewind 方法将 position 重新置为 0。或者调用 get(int i) 方法获取索引 i 的内容,它不会移动读指针
mark和reset
mark 是在读取时,做一个标记,即使 position 改变,只要调用 reset 就能回到 mark 的位置。注意:rewind 和 flip 都会清除 mark 位置
字符串与ByteBuffer互转
 1
 2
 3
 4
 5
 6
 7
 8
 9
10
11
12
13
14
15
16
17
18
19
20
21
22
|
public class TestByteBufferString {
    public static void main(String[] args) {
        // 1.字符串直接转字节数组
        ByteBuffer byteBuffer = ByteBuffer.allocate(16);
        String s = "buffer";
        byteBuffer.put(s.getBytes());
        System.out.println("position:" + byteBuffer.position() + " limit:" + byteBuffer.limit());

        // 2.position是0,可以直接读
        ByteBuffer byteBuffer1 = StandardCharsets.UTF_8.encode(s);
        System.out.println("position:" + byteBuffer1.position() + " limit:" + byteBuffer1.limit());

        // 3.wrap,可以直接读
        ByteBuffer byteBuffer2 = ByteBuffer.wrap(s.getBytes());
        System.out.println("position:" + byteBuffer2.position() + " limit:" + byteBuffer2.limit());

        // StandardCharsets读buffer
        String s1 = StandardCharsets.UTF_8.decode(byteBuffer1).toString();
        System.out.println("position:" + byteBuffer1.position() + " limit:" + byteBuffer1.limit());
        System.out.println(s1);
    }
}
|
执行结果:
position:6 limit:16
position:0 limit:6
position:0 limit:6
position:6 limit:6
buffer
分散读取
file.txt内容:
把文件中的数据填充到多个buffer
 1
 2
 3
 4
 5
 6
 7
 8
 9
10
11
12
13
14
15
16
17
18
19
20
|
public class TestScatteringRead {

    public static void main(String[] args) {
        try (RandomAccessFile file = new RandomAccessFile("file.txt", "rw")) {
            FileChannel channel = file.getChannel();
            ByteBuffer a = ByteBuffer.allocate(6);
            ByteBuffer b = ByteBuffer.allocate(6);
            ByteBuffer c = ByteBuffer.allocate(6);
            channel.read(new ByteBuffer[]{a, b, c});
            a.flip();
            b.flip();
            c.flip();
            System.out.println(StandardCharsets.UTF_8.decode(a).toString());
            System.out.println(StandardCharsets.UTF_8.decode(b).toString());
            System.out.println(StandardCharsets.UTF_8.decode(c).toString());
        } catch (IOException e) {
            e.printStackTrace();
        }
    }
}
|
运行结果:
集中写入
与上面的分散读取进channel,这里也可以从多个channel集中写入文件
1
2
3
4
5
6
7
8
9
10
11
12
13
|
public class TestGatheringWrite {
public static void main(String[] args) {
ByteBuffer byteBuffer = StandardCharsets.UTF_8.encode("你好呀!");
ByteBuffer byteBuffer1 = StandardCharsets.UTF_8.encode("hi!");
ByteBuffer byteBuffer2 = StandardCharsets.UTF_8.encode("hello!");
try (FileChannel channel = new RandomAccessFile("gathering.txt", "rw").getChannel()) {
channel.write(new ByteBuffer[]{byteBuffer, byteBuffer1, byteBuffer2});
} catch (IOException e) {
e.printStackTrace();
}
}
}
|
对于分散读和集中写,可以减少buffer之间的复制,从而可以提升性能。
小练习
网络上有多条数据发送给服务端,数据之间使用 \n 进行分隔
但由于某种原因这些数据在接收时,被进行了重新组合,例如原始数据有3条为
- Hello,world\n
- I’m zhangsan\n
- How are you?\n
变成了下面的两个 byteBuffer (黏包,半包)
- Hello,world\nI’m zhangsan\nHo
- w are you?\n
现在将错乱的数据恢复成原始的按 \n 分隔的数据
 1
 2
 3
 4
 5
 6
 7
 8
 9
10
11
12
13
14
15
16
17
18
19
20
21
22
23
24
25
26
|
public class TestExam {
public static void main(String[] args) {
ByteBuffer source = ByteBuffer.allocate(32);
source.put("Hello,world\nI'm zhangsan\nHo".getBytes());
solve(source);
source.put("w are you?\nhaha!\n".getBytes());
solve(source);
}
private static void solve(ByteBuffer source) {
source.flip();
for (int i = 0; i < source.limit(); i++) {
if (source.get(i) == '\n') {
int length = i + 1 - source.position();
ByteBuffer target = ByteBuffer.allocate(length);
for (int j = 0; j < length; j++) {
target.put(source.get());
}
target.flip();
System.out.println(StandardCharsets.UTF_8.decode(target).toString());
}
}
source.compact();
}
}
|
上面的案列,效率比较低,因为它需要一个个的去遍历。
文件编程
在NIO中有一个FileChannel的channel实现,用于文件操作。FileChannel 只能工作在阻塞模式下
不能直接打开 FileChannel,必须通过 FileInputStream、FileOutputStream 或者 RandomAccessFile 来获取 FileChannel,它们都有 getChannel 方法
- 通过 FileInputStream 获取的 channel 只能读
- 通过 FileOutputStream 获取的 channel 只能写
- 通过 RandomAccessFile 是否能读写根据构造 RandomAccessFile 时的读写模式决定
读取:
1
|
int readBytes = channel.read(buffer);
|
写入:
1
2
3
4
5
6
7
|
ByteBuffer buffer = ...;
buffer.put(...); // 存入数据
buffer.flip(); // 切换读模式
while(buffer.hasRemaining()) {
channel.write(buffer);
}
|
在 while 中调用 channel.write 是因为 write 方法并不能保证一次将 buffer 中的内容全部写入 channel
关闭:
channel 必须关闭,不过调用了 FileInputStream、FileOutputStream 或者RandomAccessFile 的 close 方法会间接地调用 channel 的 close 方法
位置
获取当前位置
1
|
long pos = channel.position();
|
设置当前位置
1
2
|
long newPos = ...;
channel.position(newPos);
|
设置当前位置时,如果设置为文件的末尾
- 这时读取会返回 -1
- 这时写入,会追加内容,但要注意如果 position 超过了文件末尾,再写入时在新内容和原末尾之间会有空洞(00)
强制写入
操作系统出于性能的考虑,会将数据缓存,不是立刻写入磁盘。可以调用 force(true) 方法将文件内容和元数据(文件的权限等信息)立刻写入磁盘
两个 Channel 传输数据
1
2
3
4
5
6
7
8
9
10
11
12
13
14
15
16
17
|
public class TestFileChannel01 {
public static void main(String[] args) {
String FROM = "from.txt";
String TO = "to.txt";
long start = System.nanoTime();
try (FileChannel from = new FileInputStream(FROM).getChannel();
FileChannel to = new FileOutputStream(TO).getChannel();
) {
from.transferTo(0, from.size(), to);
} catch (IOException e) {
e.printStackTrace();
}
long end = System.nanoTime();
System.out.println("transferTo 用时:" + (end - start) / 1000_000.0);
}
}
|
结果:transferTo 用时:7.341
大文件传输
面对大文件传输,可以多次的发送
1
2
3
4
5
6
7
8
9
10
11
12
13
14
15
16
17
|
public class TestFileChannel02 {
public static void main(String[] args) {
try (
FileChannel from = new FileInputStream("data.txt").getChannel();
FileChannel to = new FileOutputStream("to.txt").getChannel();
) {
long size = from.size();
// left 变量代表还剩余多少字节
for (long left = size; left > 0; ) {
System.out.println("position:" + (size - left) + " left:" + left);
left -= from.transferTo((size - left), left, to);
}
} catch (IOException e) {
e.printStackTrace();
}
}
}
|
Paths类
jdk7 引入了 Path 和 Paths 类
- Path 用来表示文件路径
- Paths 是工具类,用来获取 Path 实例
1
2
3
4
5
6
7
8
9
10
11
|
// 相对路径 使用 user.dir 环境变量来定位 1.txt
Path source = Paths.get("1.txt");
// 绝对路径 表示 d:\1.txt
Path source = Paths.get("d:\\1.txt");
// 绝对路径 同样表示 d:\1.txt
Path source = Paths.get("d:/1.txt");
// 表示 d:\data\projects
Path projects = Paths.get("d:\\data", "projects");
|
1
2
3
|
Path path = Paths.get("d:\\data\\projects\\a\\..\\b");
System.out.println(path);
System.out.println(path.normalize()); // 正常化路径
|
输出:
1
2
|
d:\data\projects\a\..\b
d:\data\projects\b
|
Files类
检查文件
1
2
|
Path path = Paths.get("helloword/data.txt");
System.out.println(Files.exists(path));
|
创建一级目录:如果目录已存在,会抛异常 FileAlreadyExistsException,不能一次创建多级目录,否则会抛异常 NoSuchFileException
1
2
|
Path path = Paths.get("helloword/d1");
Files.createDirectory(path);
|
创建多级目录:
1
2
|
Path path = Paths.get("helloword/d1/d2");
Files.createDirectories(path);
|
拷贝文件:如果文件已存在,会抛异常 FileAlreadyExistsException
1
2
3
4
|
Path source = Paths.get("helloword/data.txt");
Path target = Paths.get("helloword/target.txt");
Files.copy(source, target);
|
如果希望用 source 覆盖掉 target,需要用 StandardCopyOption 来控制
1
|
Files.copy(source, target, StandardCopyOption.REPLACE_EXISTING);
|
遍历文件夹:
 1
 2
 3
 4
 5
 6
 7
 8
 9
10
11
12
13
14
15
16
17
18
19
20
21
22
23
24
25
26
27
|
public class TestFilesAndPaths {
public static void main(String[] args) {
AtomicInteger dirCount = new AtomicInteger();
AtomicInteger fileCount = new AtomicInteger();
try {
Files.walkFileTree(Paths.get("E:\\java\\project\\netty-practice"),new SimpleFileVisitor<Path>(){
@Override
public FileVisitResult preVisitDirectory(Path dir, BasicFileAttributes attrs) throws IOException {
System.out.println(dir.toString());
dirCount.incrementAndGet();
return super.preVisitDirectory(dir, attrs);
}
@Override
public FileVisitResult visitFile(Path file, BasicFileAttributes attrs) throws IOException {
System.out.println(file.toString());
fileCount.incrementAndGet();
return super.visitFile(file, attrs);
}
});
System.out.println("文件夹数:"+dirCount.get());
System.out.println("文件数:"+fileCount.get());
} catch (IOException e) {
e.printStackTrace();
}
}
}
|
删除多级目录:
1
2
3
4
5
6
7
8
9
10
11
12
13
14
15
16
17
18
19
20
|
public class TestDeleteMoreDir {
public static void main(String[] args) throws IOException {
Path path = Paths.get("d:\\tmp");
Files.walkFileTree(path, new SimpleFileVisitor<Path>(){
@Override
public FileVisitResult visitFile(Path file, BasicFileAttributes attrs)
throws IOException {
Files.delete(file);
return super.visitFile(file, attrs);
}
@Override
public FileVisitResult postVisitDirectory(Path dir, IOException exc)
throws IOException {
Files.delete(dir);
return super.postVisitDirectory(dir, exc);
}
});
}
}
|
拷贝多级目录:
1
2
3
4
5
6
7
8
9
10
11
12
13
14
15
16
17
18
19
20
21
22
23
24
25
|
public class TestCopyFiles {
public static void main(String[] args) throws IOException {
long start = System.currentTimeMillis();
String source = "D:\\source";
String target = "D:\\target";
Files.walk(Paths.get(source)).forEach(path -> {
try {
String targetName = path.toString().replace(source, target);
// 是目录
if (Files.isDirectory(path)) {
Files.createDirectory(Paths.get(targetName));
}
// 是普通文件
else if (Files.isRegularFile(path)) {
Files.copy(path, Paths.get(targetName));
}
} catch (IOException e) {
e.printStackTrace();
}
});
long end = System.currentTimeMillis();
System.out.println(end - start);
}
}
|
网络编程
阻塞模式
 1
 2
 3
 4
 5
 6
 7
 8
 9
10
11
12
13
14
15
16
17
18
19
20
21
22
23
24
25
26
27
28
29
30
31
32
33
34
|
@Slf4j
public class TestBlockingServer {
public static void main(String[] args) {
// 使用 nio 来理解阻塞模式, 单线程
// 0. ByteBuffer
ByteBuffer buffer = ByteBuffer.allocate(16);
// 1. 创建了服务器
ServerSocketChannel ssc = ServerSocketChannel.open();
// 2. 绑定监听端口
ssc.bind(new InetSocketAddress(8080));
// 3. 连接集合
List<SocketChannel> channels = new ArrayList<>();
while (true) {
// 4. accept 建立与客户端连接, SocketChannel 用来与客户端之间通信
log.debug("connecting...");
// 阻塞方法,线程停止运行
SocketChannel sc = ssc.accept();
log.debug("connected... {}", sc);
channels.add(sc);
for (SocketChannel channel : channels) {
// 5. 接收客户端发送的数据
log.debug("before read... {}", channel);
// 阻塞方法,线程停止运行
channel.read(buffer);
buffer.flip();
System.out.println("position:" + buffer.position() + " limit:" + buffer.limit() + "===>"+StandardCharsets.UTF_8.decode(buffer).toString());
buffer.clear();
log.debug("after read...{}", channel);
}
}
}
}
|
客户端
1
2
3
4
5
6
7
|
public class TestClient {
public static void main(String[] args) throws IOException {
SocketChannel sc = SocketChannel.open();
sc.connect(new InetSocketAddress("localhost", 8080));
System.out.println("waiting...");
}
}
|
服务端的accept方法会阻塞整个线程直至有客户端连接上,read方法也会阻塞线程,直至有客户端发送数据过来。
非阻塞模式
- 非阻塞模式下,相关方法都会不会让线程暂停
- 在 ServerSocketChannel.accept 在没有连接建立时,会返回 null,继续运行
- SocketChannel.read 在没有数据可读时,会返回 0,但线程不必阻塞,可以去执行其它 SocketChannel 的 read 或是去执行 ServerSocketChannel.accept
- 写数据时,线程只是等待数据写入 Channel 即可,无需等 Channel 通过网络把数据发送出去
- 但非阻塞模式下,即使没有连接建立,和可读数据,线程仍然在不断运行,白白浪费了 cpu
- 数据复制过程中,线程实际还是阻塞的(AIO 改进的地方)
客户端代码:
 1
 2
 3
 4
 5
 6
 7
 8
 9
10
11
12
13
14
15
16
17
18
19
20
21
22
23
24
25
26
27
28
29
30
31
32
33
34
35
|
@Slf4j
public class TestUnBlockingServer {
    public static void main(String[] args) throws IOException {
        // 使用 nio 来理解非阻塞模式, 单线程
        // 0. ByteBuffer
        ByteBuffer buffer = ByteBuffer.allocate(16);
        // 1. 创建了服务器
        ServerSocketChannel ssc = ServerSocketChannel.open();
        ssc.configureBlocking(false); // 非阻塞模式
        // 2. 绑定监听端口
        ssc.bind(new InetSocketAddress(8080));
        // 3. 连接集合
        List<SocketChannel> channels = new ArrayList<>();
        while (true) {
            // 4. accept 建立与客户端连接, SocketChannel 用来与客户端之间通信
            // 非阻塞,线程还会继续运行,如果没有连接建立,但sc是null
            SocketChannel sc = ssc.accept();
            if (sc != null) {
                log.debug("connected... {}", sc);
                sc.configureBlocking(false); // 非阻塞模式
                channels.add(sc);
            }
            for (SocketChannel channel : channels) {
                // 5. 接收客户端发送的数据
                int read = channel.read(buffer);// 非阻塞,线程仍然会继续运行,如果没有读到数据,read 返回 0
                if (read > 0) {
                    buffer.flip();
                    System.out.println("position:" + buffer.position() + " limit:" + buffer.limit() + "===>"+ StandardCharsets.UTF_8.decode(buffer).toString());
                    buffer.clear();
                    log.debug("after read...{}", channel);
                }
            }
        }
    }
}
|
服务端代码不变。
ServerSocketChannel设置成非阻塞之后,调用accept方法之后确实不会阻塞,但是如果没有客户端连接的话,这个线程就会一直空转,一直等待客户端的连接,因此会造成CPU的浪费。同理SocketChannel也是。
多路复用
单线程可以配合 Selector 完成对多个 Channel 可读写事件的监控,这称之为多路复用
- 多路复用仅针对网络 IO、普通文件 IO 没法利用多路复用
- 如果不用 Selector 的非阻塞模式,线程大部分时间都在做无用功,而 Selector 能够保证
- 有可连接事件时才去连接
- 有可读事件才去读取
- 有可写事件才去写入
- 限于网络传输能力,Channel 未必时时可写,一旦 Channel 可写,会触发 Selector 的可写事件
NIO vs BIO